
TL;DR
A closet can become a surprisingly good space for recording or AI rigs if you focus on proper placement, effective materials, and sealing leaks. Moving the rig away and controlling sound leaks matter more than just adding foam.
Think your tiny closet is just a storage pit? Think again. With the right setup, it can become a surprisingly effective space for recording vocals, voice-overs, or even housing your AI workstation.
The secret isn’t just slapping foam on the walls — it’s about understanding how sound behaves in tiny spaces, where to place treatment, and how to stop sound leaks. This guide breaks down what really works, with real-world tips and no-fluff advice.
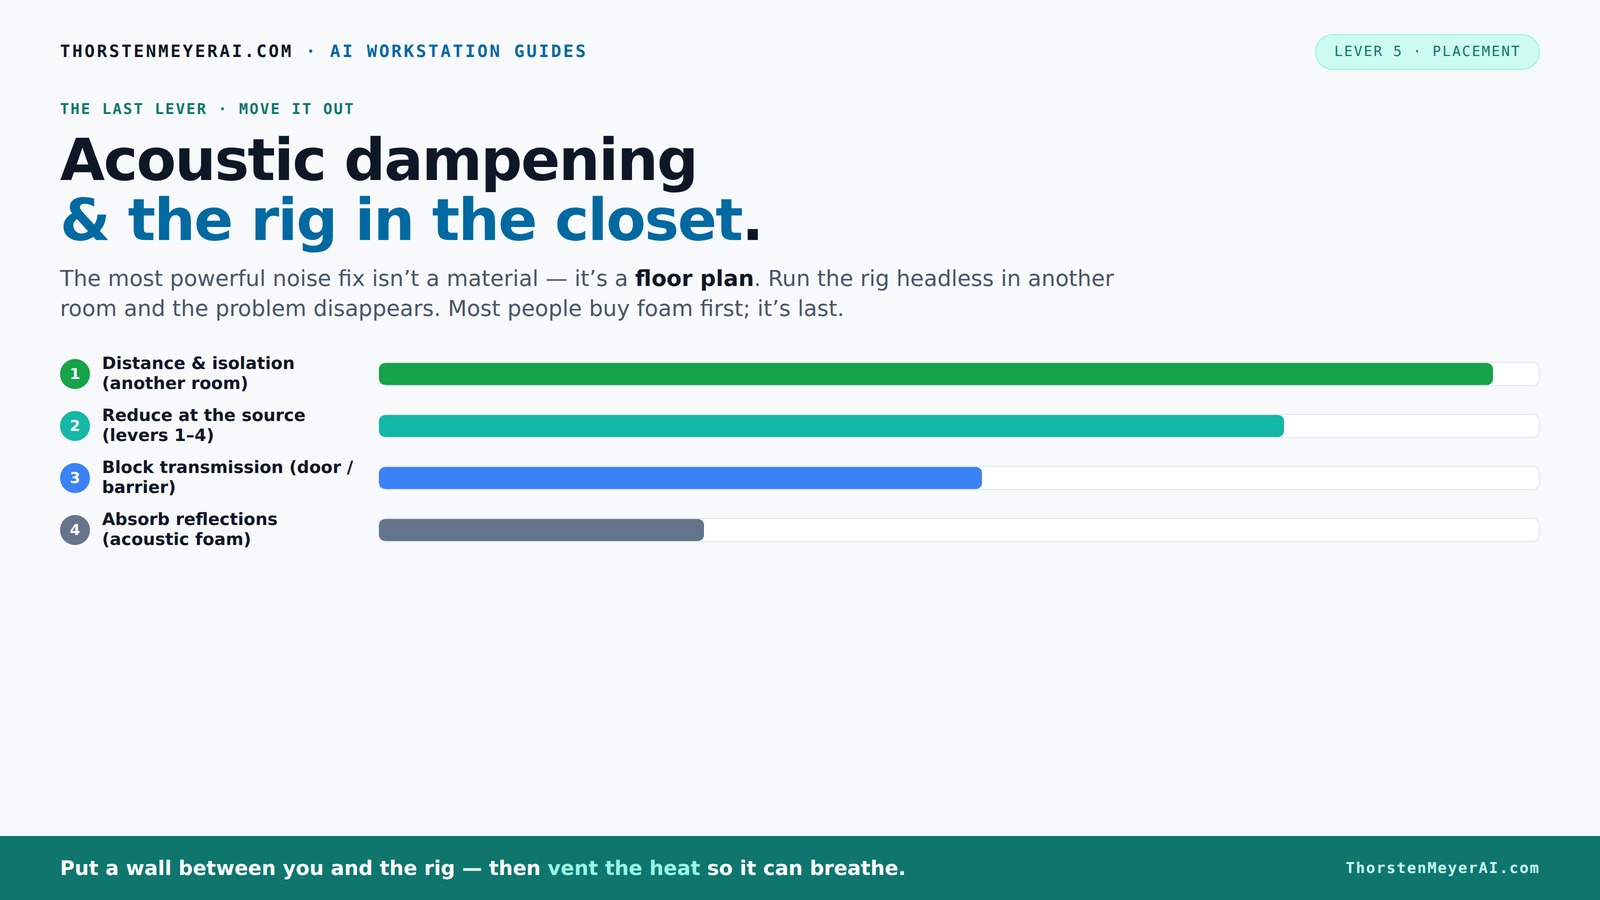
Acoustic dampening
& the rig in the closet.
The most powerful noise fix isn’t a material — it’s a floor plan. A rig you can’t hear because it’s in another room beats any amount of foam. Tap the approaches in Part 1 to see what actually works.
(another room)
(levers 1–4)
(door / barrier)
(acoustic foam)
Contain the noise, not the heat
Key Takeaways
- Cover 20-30% of your closet walls with thick material for a noticeable echo reduction.
- Focus on first reflection points — behind the mic, ceiling, and desk surface — for best clarity.
- Seal gaps around the door with weatherstripping or acoustic seals to prevent leaks.
- Place bass traps in corners to control low-frequency buildup in small rooms.
- Moving your rig into a separate, ventilated space can eliminate noise issues entirely.

Focusound 52 Pack Acoustic Foam Panels 1" x 12" x 12" Sound Proof Foam Panles Soundproofing Noise Cancelling Wedge Panels for Home Office Recoding Studio with 300PCS Double-Side Adhesive
Soundproofing - Acoustic foam panels triangular grooves structure for better noise absorption, helps to reduce and absorb unwanted...
As an affiliate, we earn on qualifying purchases.
As an affiliate, we earn on qualifying purchases.
What Exactly Is a 'Closet Rig' and Why Use One?
A 'closet rig' is simply turning a small closet into a controlled acoustic space — a vocal booth, a podcast nook, or a quiet housing for your AI workstation. It’s about turning a cramped space into a manageable, sound-controlled environment.
Imagine sealing a small walk-in closet, lining it with blankets, and suddenly, your echoey mess becomes a cozy, muffled sanctuary. For voice work or sensitive AI tasks, proximity isn’t everything; quiet is.
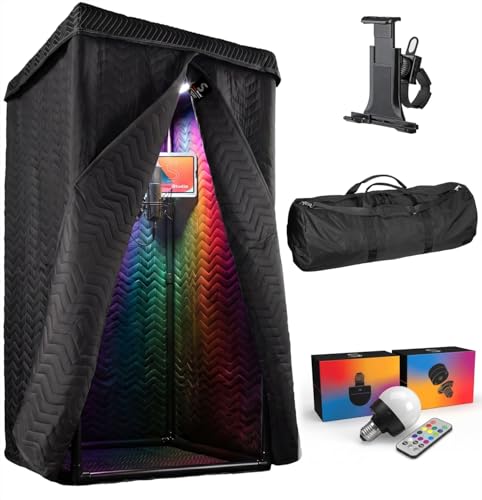
'Snap Studio' XL Portable Recording Booth | '#1 Vocal Booth' Rolling Stone | Record Crisp Dry Echo-Free Vocals at Home or On-The-Road | The Original & Best Studio Booth, Trusted By Singers & Voiceover
#1 Recommended Portable Recording Booth — Featured by Rolling Stone Magazine as the “best sound booth”, Snap Studio’s...
As an affiliate, we earn on qualifying purchases.
As an affiliate, we earn on qualifying purchases.
Why Small Spaces Sound Worse — But Can Be Fixed
Small spaces like closets tend to sound 'boxy' — reflections bounce around, creating echo and muddiness. These reflections can blur the clarity of your recordings, making voices sound hollow or artificial. Additionally, low-frequency buildup, often called 'standing waves,' can cause certain bass notes to sound boomy or exaggerated, which complicates mixing or AI audio processing.
However, understanding these issues is the first step to fixing them. By strategically placing absorptive materials and sealing leaks, you can significantly improve sound clarity. Think of it as tuning a musical instrument — small adjustments can have a profound effect on the overall tone and accuracy of your recordings or AI sound environment.

MAXTID Large Door Draft Stopper for Bottom of Doors 36” Under Door Sweep Noise Blocker Black Gap Stoppers Adjustable Doors Seal Sweep Guard Draft, Window Breeze Stoppers, Home Essentials Gadgets
Large door draft stopper foam is 2 inches in diameter, which is larger than most sellers' foam and...
As an affiliate, we earn on qualifying purchases.
As an affiliate, we earn on qualifying purchases.
Where to Place Absorbers for the Best Sound Control
Placement is critical because it targets the primary sources of unwanted reflections and standing waves. First reflection points — the surfaces directly reflecting sound from your microphone or speakers — are where absorption yields the most noticeable improvement. Placing panels behind your mic, on the ceiling above, and on the wall opposite the mic intercepts early reflections that can muddy your recordings.
Sealing sound leaks at doors with heavy blankets or acoustic sealant prevents external noise from entering and internal sound from escaping, preserving a controlled environment. Rugs or carpets on the floor absorb bouncing sound and prevent room tone from coloring your recordings.
For optimal placement:
- Position bass traps in corners to dampen low-frequency standing waves, which tend to accumulate in these areas.
- Place absorption panels at first reflection points to improve clarity and reduce echo.
- Seal gaps around the door with weatherstripping or acoustic foam to prevent sound leaks that can compromise your setup.
Understanding where to place these materials ensures your efforts are focused on the most impactful areas, balancing absorption with leakage control for a cleaner, more professional sound.
AI workstation noise reduction equipment
As an affiliate, we earn on qualifying purchases.
As an affiliate, we earn on qualifying purchases.
Which Materials Work Best in Small Closets?
Thick, soft, and textured materials outperform thin foam in small spaces because they absorb a broader spectrum of frequencies, including the problematic low-end. For more on effective materials, see which materials work best in small closets. Using materials like mattresses wrapped around walls or hanging thick quilts creates a multi-layered barrier that dampens sound more effectively than single-layer foam.
Using materials like mattresses wrapped around walls or hanging thick quilts creates a multi-layered barrier that dampens sound more effectively than single-layer foam. For a more engineered approach, bass traps and dense foam panels—particularly those 3-4 inches thick—are designed to target low frequencies, which tend to dominate in small rooms. The thicker the material, the deeper the absorption, making it easier to tame bass and reduce muddiness.
Tradeoffs include cost, space, and installation effort; thicker materials can take up more room but yield better results. Balancing these factors is key to optimizing your closet’s acoustic environment.
How Much Treatment Is Enough? The Sweet Spot
In a tiny closet, covering around 20-30% of the walls with thick, absorbent material usually strikes a good balance between effectiveness and practicality. For more tips on treatment coverage, see pottyporta.com. This coverage significantly reduces flutter echoes and low-frequency buildup, leading to clearer recordings and better AI processing.
However, if you notice persistent bass issues or echo, increasing coverage—up to full wall coverage—can make a noticeable difference. Think of it as creating a more 'dead' space where sound doesn't bounce freely. Prioritizing the first reflection points and corners for bass traps ensures your treatment targets the most problematic areas, giving you a cleaner, more controlled environment without overwhelming the space.
Tradeoffs include sacrificing some usable space for treatment, so consider your specific needs and space constraints. The goal is to find a balance where the room sounds natural yet controlled, enabling better recordings and AI performance.
Common Mistakes That Sabotage Your Closet Soundproofing
Many assume that simply adding foam panels is enough to soundproof a closet. While foam helps with reflections, neglecting proper sealing can undermine your efforts. For more on sealing and safety, see acoustic dampening, placement, and the 'Rig in the Closet' setup. Ignoring gaps around the door, window, or vents allows sound leaks that can ruin the acoustic isolation you’ve worked on.
Another common mistake is focusing only on treating corners or certain surfaces, while neglecting the ceiling and door. Sound can escape through these untreated areas, especially if they’re large gaps or cracks. Properly sealing these points with weatherstripping, acoustic sealant, or draft stoppers is essential to maintain a controlled environment. Remember, the goal is to create a balanced space where reflections are minimized and sound leaks are sealed, ensuring your setup is effective and sustainable.
DIY or Buy? Making Your Closet a Quiet Space on Any Budget
DIY solutions like hanging blankets, using thick rugs, or installing makeshift panels can dramatically improve your closet’s acoustics without breaking the bank. For more ideas on affordable treatment options, visit Delvaste.ble, easy to implement, and can be tailored to your specific space. For example, layered blankets or quilts can absorb a significant amount of sound, especially when strategically placed at reflection points. This approach is cost-effective and allows for quick adjustments as needed.
For more serious soundproofing, investing in professional-grade bass traps, custom acoustic panels, or purpose-built soundproof cabinets offers substantial improvements. These solutions are designed to target low frequencies and leaks more effectively but come at a higher cost and installation effort. They’re ideal if you need professional-quality recordings or want the highest level of noise isolation.
Ultimately, a hybrid approach—combining DIY methods with selective professional upgrades—can provide excellent results within your budget. The key is to prioritize your most critical issues first and then enhance your setup over time.
Frequently Asked Questions
Can a closet really work as a vocal booth or recording space?
Absolutely. With proper treatment, sealing, and ventilation, a closet can become a surprisingly effective vocal booth. It’s all about controlling reflections, leaks, and low-end buildup.
Where should I place acoustic foam or panels in a closet?
Focus on first reflection points — behind the mic, the ceiling directly above, and the wall opposite the mic. Covering these areas reduces echo and improves clarity in recordings.
Do I treat the corners, walls, ceiling, or door first?
Start with the door and first reflection points. Then add bass traps in the corners to control low frequencies. Prioritizing these areas gives the biggest improvement for your small space.
How thick should acoustic panels or foam be?
Thicker panels, around 3-4 inches, absorb more bass and low frequencies. Thin foam (1-2 inches) helps with echo but less with low-end control.
Do I need bass traps in a closet?
Yes. Small rooms tend to develop low-frequency standing waves. Bass traps placed in the corners help flatten these peaks, making your recordings clearer and more balanced.
Conclusion
The secret to a quiet, usable closet rig isn’t just about adding foam — it’s about thoughtful placement, sealing leaks, and managing heat. When you treat your closet as a small acoustic environment, it transforms from a noisy box into a controlled, cozy space.
Remember: the best soundproofing combines smart placement, strategic absorption, and ventilation. Your tiny studio can punch well above its weight — as long as you balance noise control with airflow.